1.
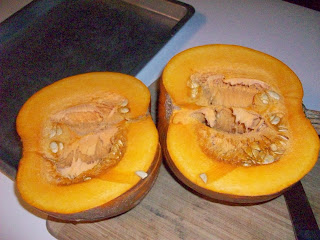
Find a pie pumpkin. The main differences are
that usually a pie pumpkin has freckles on it and they are always much more
dense than a carving pumpkin. You will be able to easily find them at your
local market or pumpkin patch this time of year.
2.
Tools for the task: A sharp knife, rimmed baking
pan, ice cream scoop, colander, spoon, mashing device (potato masher, food
processer or blender)
3.
Turn your oven on to pre-heat. I use 375, but
this process is very forgiving, so anywhere from 350 to 425 will do the trick,
you will just need to adjust the time needed depending on how much heat.
4.
Using your sharp knife and some muscle, cut the
pumpkin in half leaving the stem intact on one side.
5.
Then use your ice cream scoop to scrape the
stringy center and seeds out of each half. Put the seeds and gooey parts into a
colander.
6.
If you want easy clean-up, spray your baking pan
with a thin coating of Pam.
7.
Place each half cut side down on the baking
sheet.
8.
Roast for 45 minutes to an hour, until a fork
slides in and out of the pumpkin easily.
9.
While the pumpkin is roasting, place your
colander in the sink. Fill the sink with water just until the seeds start to
float to the top. It is really easy to
then skim the seeds out of the colander and into a bowl, picking out any orange
bits as you go. The stringy parts will hang on to the seeds, so squish them
out, rinse them a little and put them in the bowl with their friends.
10. DO
NOT put the orange goo down your garbage disposal – unless you have a crush on
your repairman and want to invite him over. Throw the goo in the trash or your
compost pile.
11.
Put the seeds back in the colander and rinse
them one more time, then pat dry with paper towels. They probably won’t get all
the way dry, but that’s okay. Put them back in the bowl and toss them with a
little bit of olive oil.
12. Spread
them out on a cookie sheet and sprinkle with kosher salt. Here is where you get
to be adventurous. Some people like to use garlic, pepper, cayenne pepper,
pretty much any spice you really like. I am a purist about these things and
only use salt.
13. As
soon as your pumpkins are fork-tender, put them on a rack to cool. As soon as
you can, flip them over this hastens the cooling process.
14. Make
your oven 400 degrees and pop those seasoned seeds in for about 15 minutes
total, flipping them over as best you can about half way through.
15.
Once the pumpkin halves are cool enough to
handle, you can often just peel the skins right off. Use a spoon to scrape any
of the meat which is stubbornly holding on and put the meat into a large bowl.
16. Then
use a mashing tool to mash the meat into a uniform consistency.
17.
Viola! Now you can proceed to make your favorite
pumpkin, bread, pumpkin cookies or pumpkin pie!
18. NOTE:
I put two cup portions into quart-sized freezer bags, mush them flat, and pop
them into the freezer. The trick with this is to get the pumpkin out of the bag
before thawing it in a bowl. (Otherwise it is a pretty messy process.)


No comments:
Post a Comment